
We recently redesigned the Mono dashboard to provide businesses and developers with more and better tools to create seamless financial experiences for their users. We implemented new, useful features and made improvements to existing ones. We have made it easier for you to manage connections and customer data on the dashboard, to use simple no-code Pages to reliably retrieve financial data.
To learn more about some of the dashboard features, keep reading or log in to see for yourself.
1. Custom Widget Builder
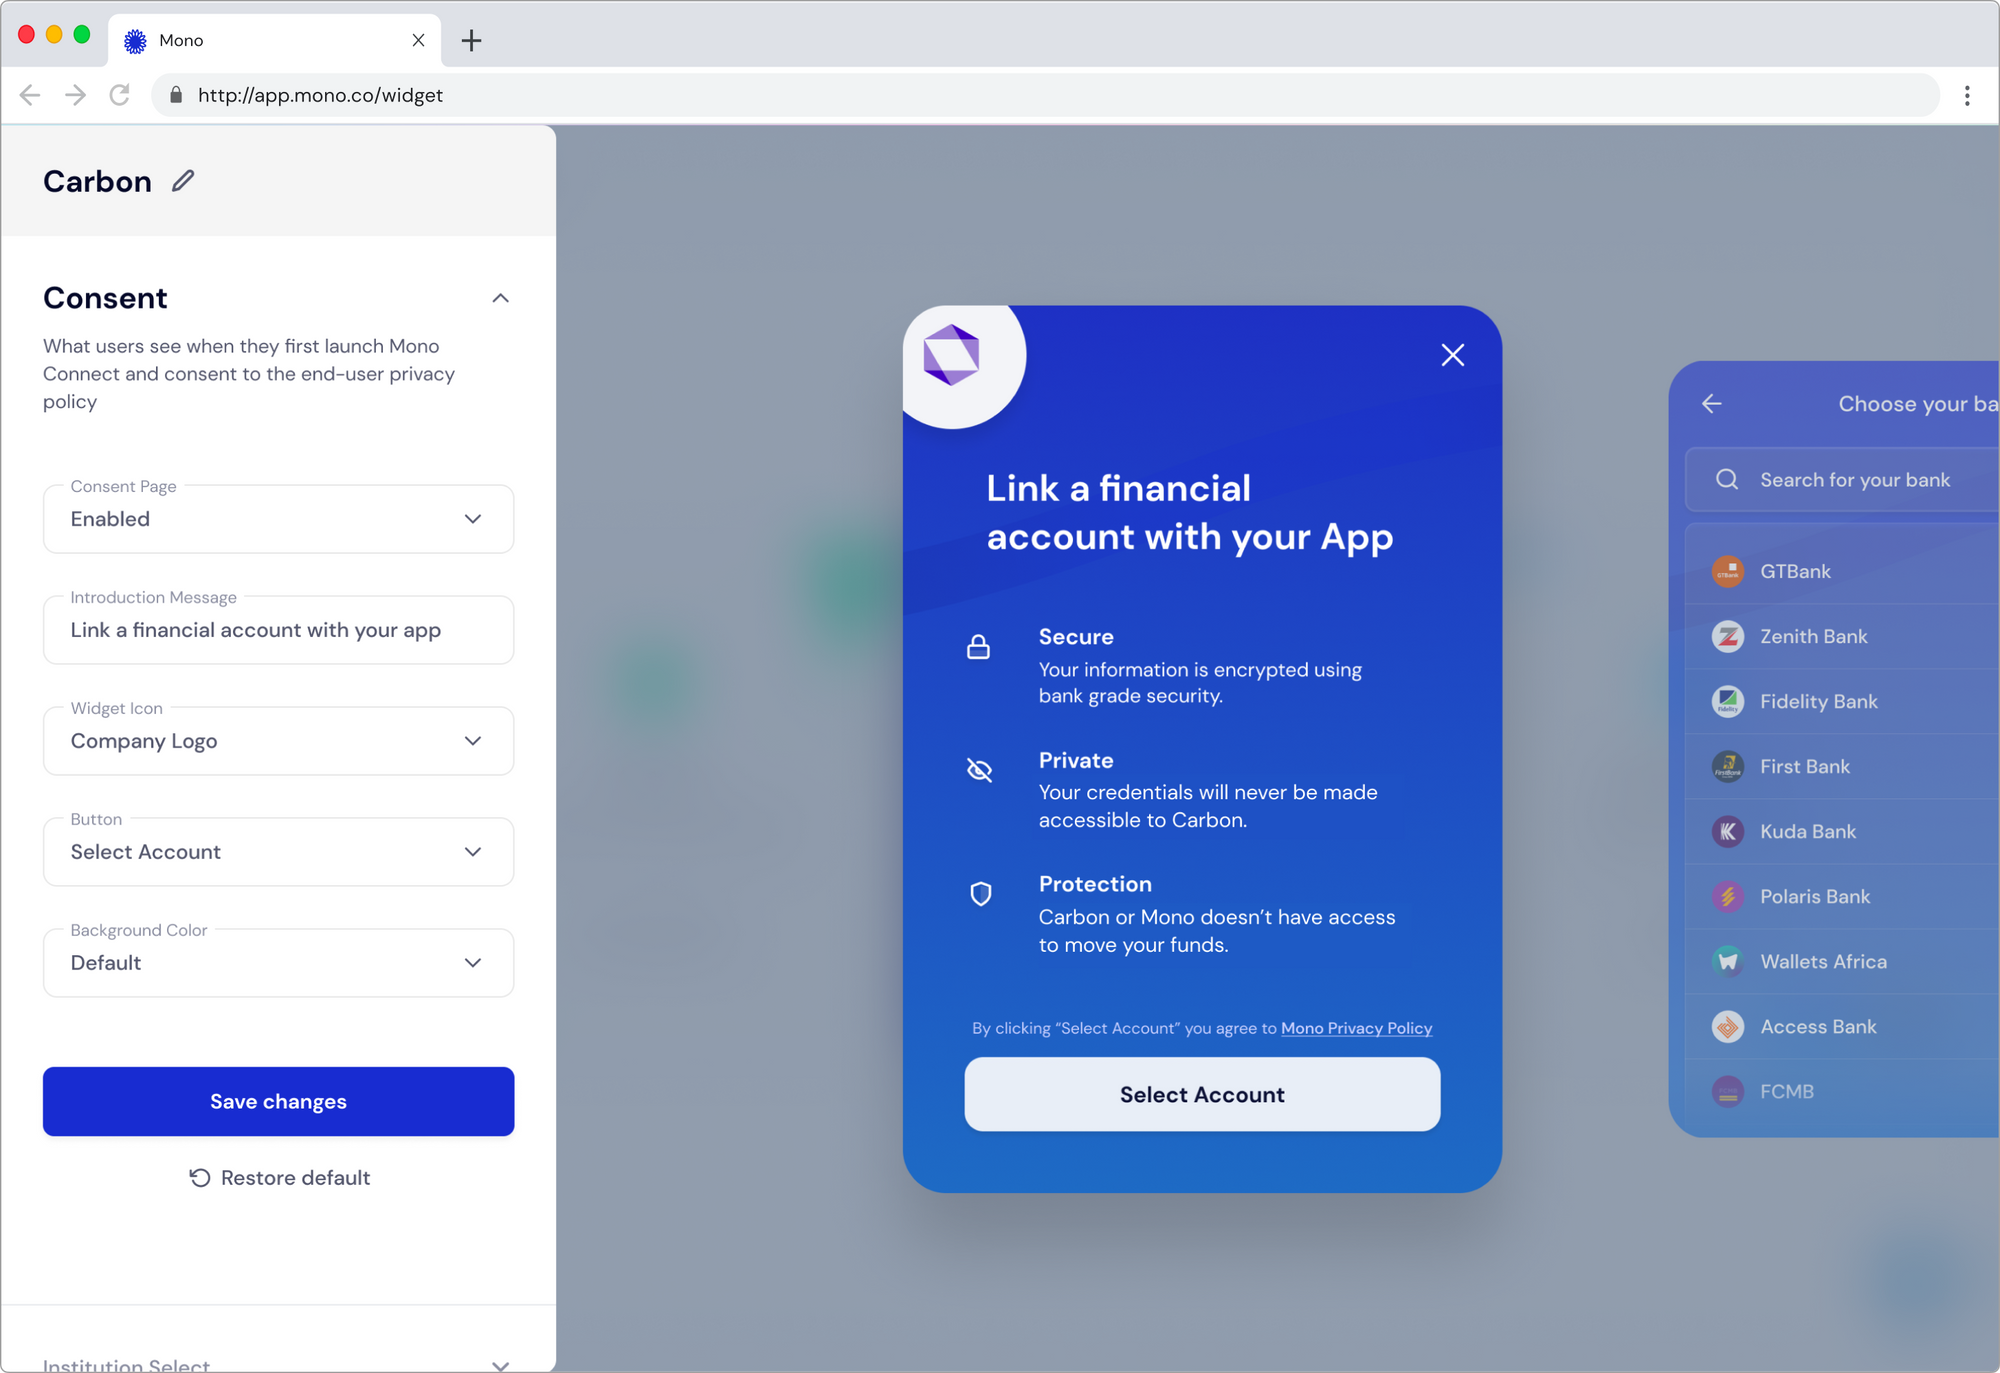
Before now, businesses on Mono weren’t able to customize the Connect Widget to fit the look and feel of their brand. With the improvements we added, you can now add your own logo, brand colour, change the copy for the CTA (Call to Action) buttons, choose and reorder which financial institutions are displayed. You can also select an account type (personal, business, or both) to be shown to customers, or enable them to link multiple accounts on the Connect widget. With this feature, you can create a personalized experience for customers when they link their financial accounts to your business.
How to access this feature
This is an add-on feature and you’ll need to pay a one-time fee to add it to your plan.
Once you have successfully subscribed to this add-on, simply navigate to the Home tab, and scroll down to find the widget builder.
Then click the ‘Manage themes’ button to set up your Connect Widget.
2. Customer Insights
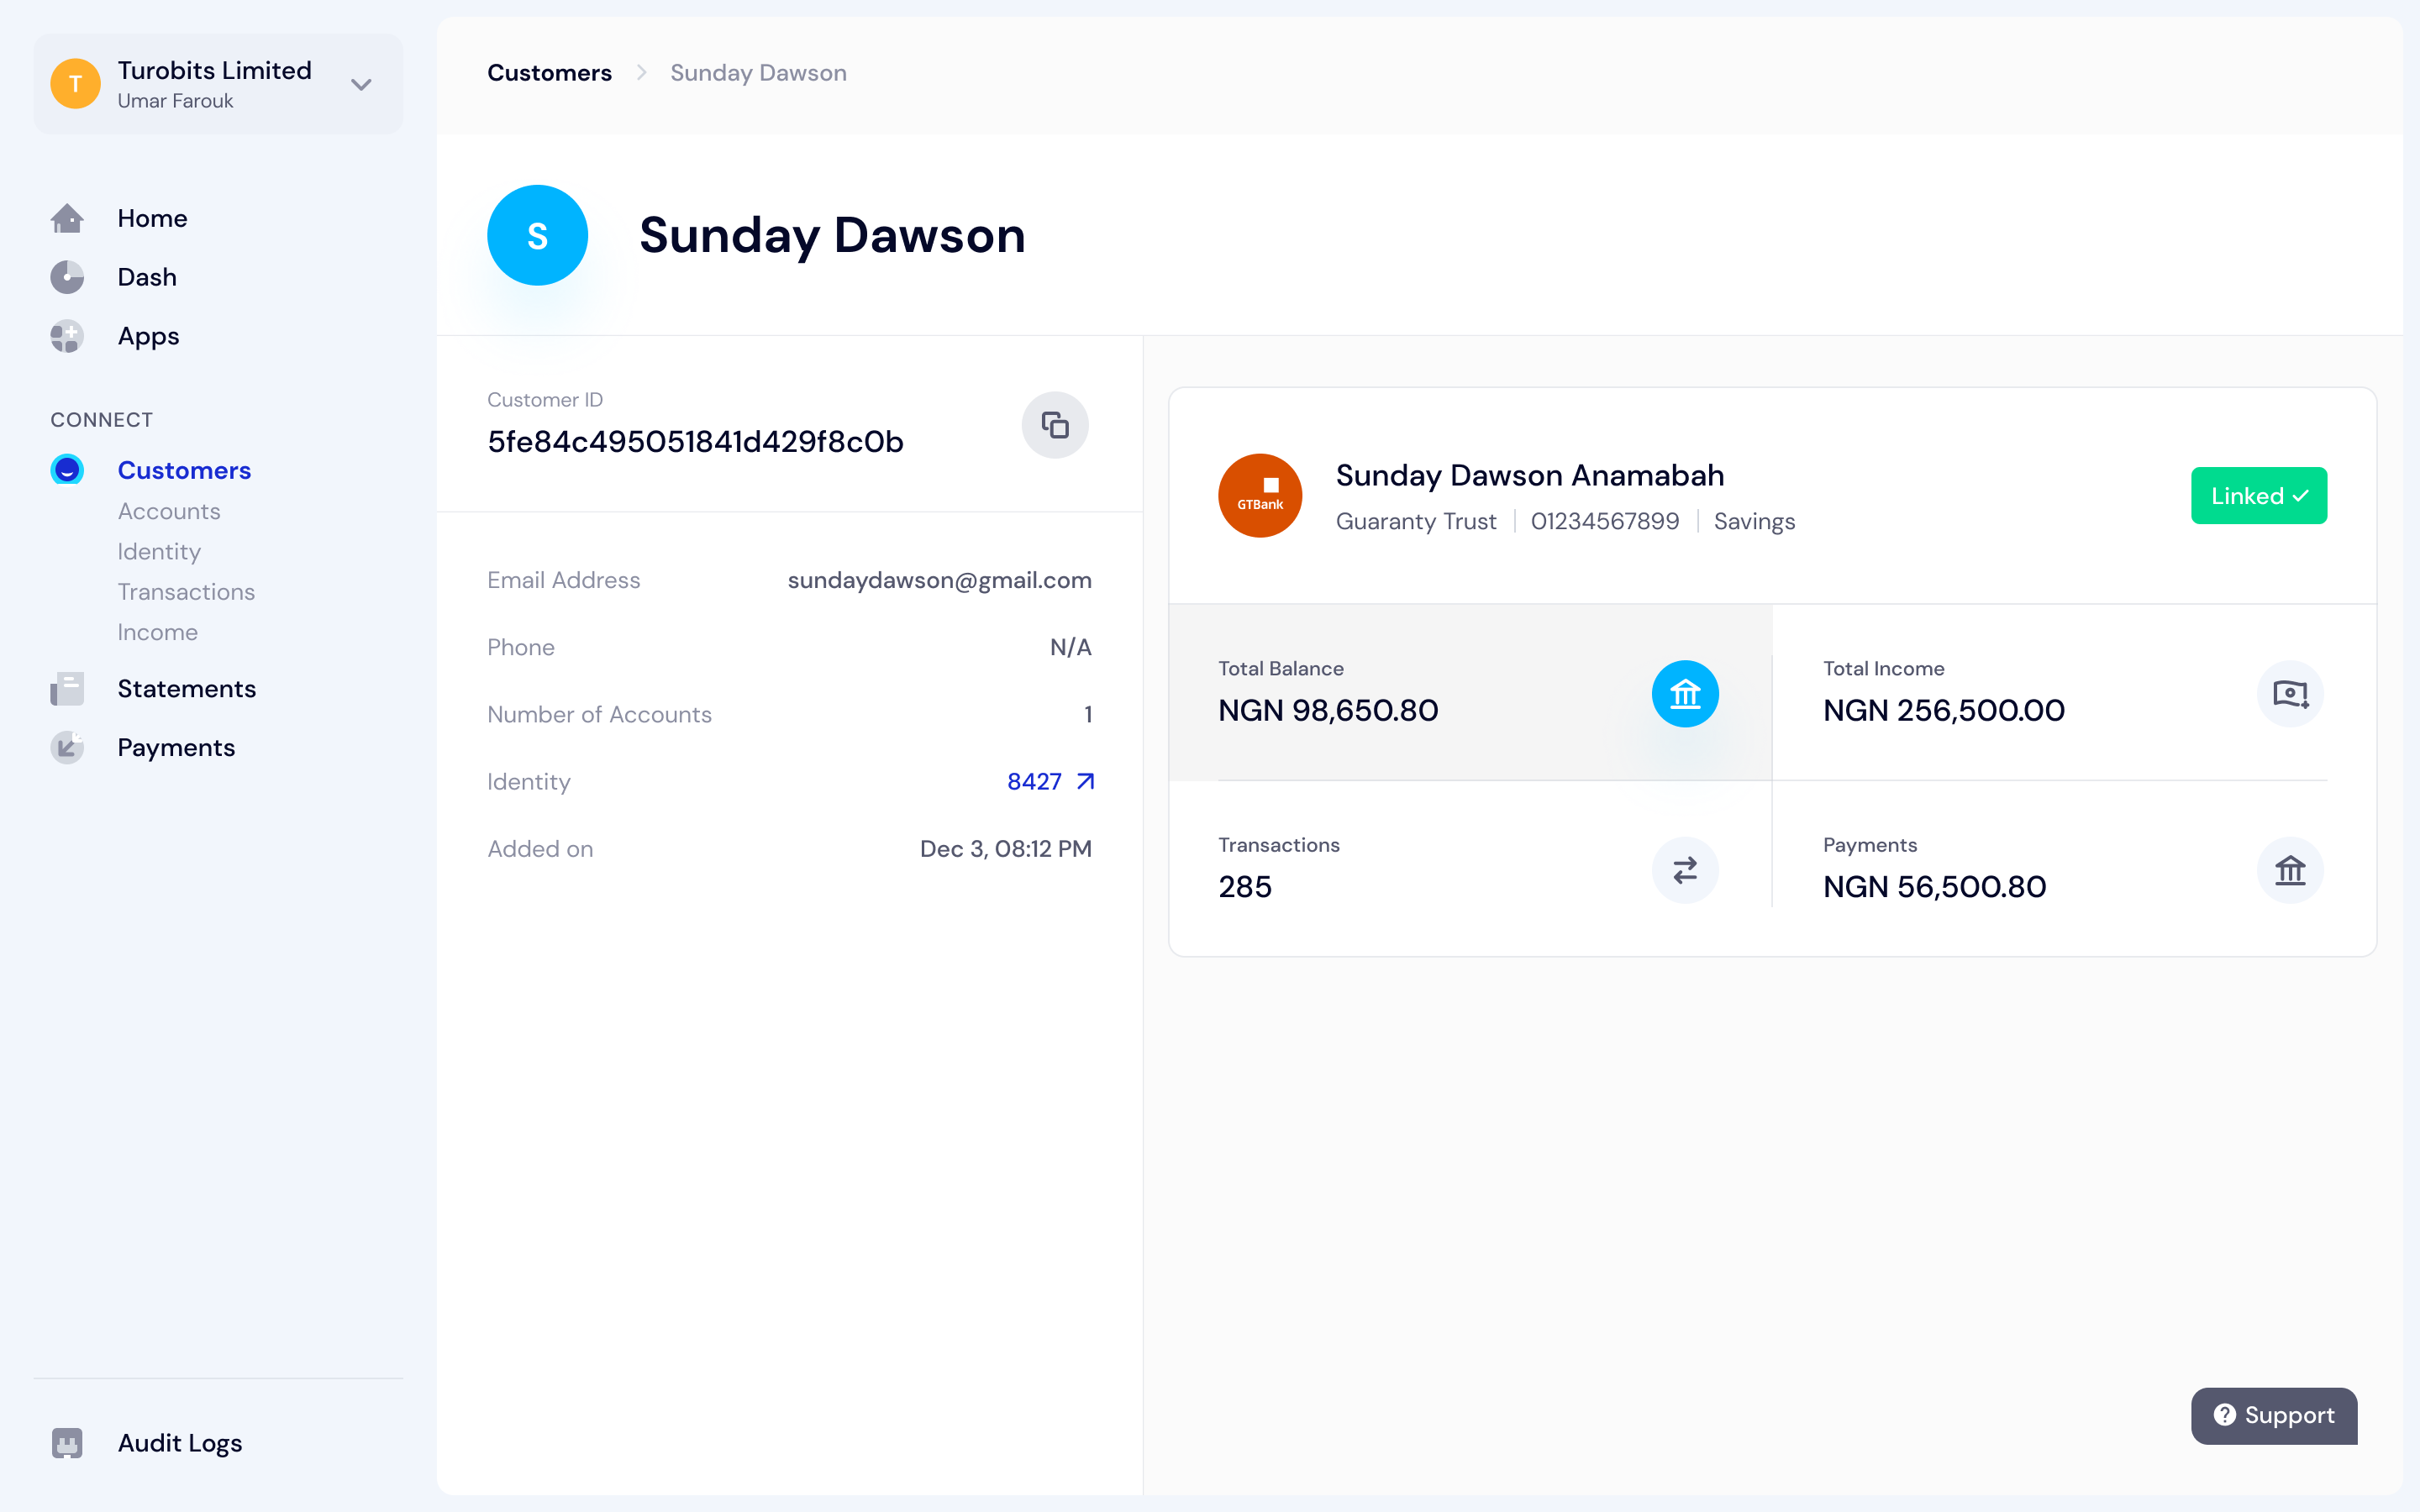
One way we ensure that you can build tailor-made experiences for your customers is through the customer insights feature. This enables you to view more detailed information on connected accounts, get to know your customers better, and track these customer data as well.
With customer insights, you can view and track information on:
Accounts: This shares your customers’ name, the financial institutions they linked, and their balances.
Identity: This retrieves identity information like verified names and BVNs of customers who linked their accounts for verification purposes.
Transactions: This details information on the inflow and outflow of cash on connected accounts.
Income: This shows an income estimate of accounts successfully linked to your app or business.
How to access this feature
This feature is available to partners on the Growth or Scale Plan, and can also be included as an add-on feature on the Entree Plan.
If you’ve successfully subscribed to this add-on, you can click on the Customers tab on the sidebar, and then select any of the options underneath to view customers’ accounts, identity, transactions, and income.
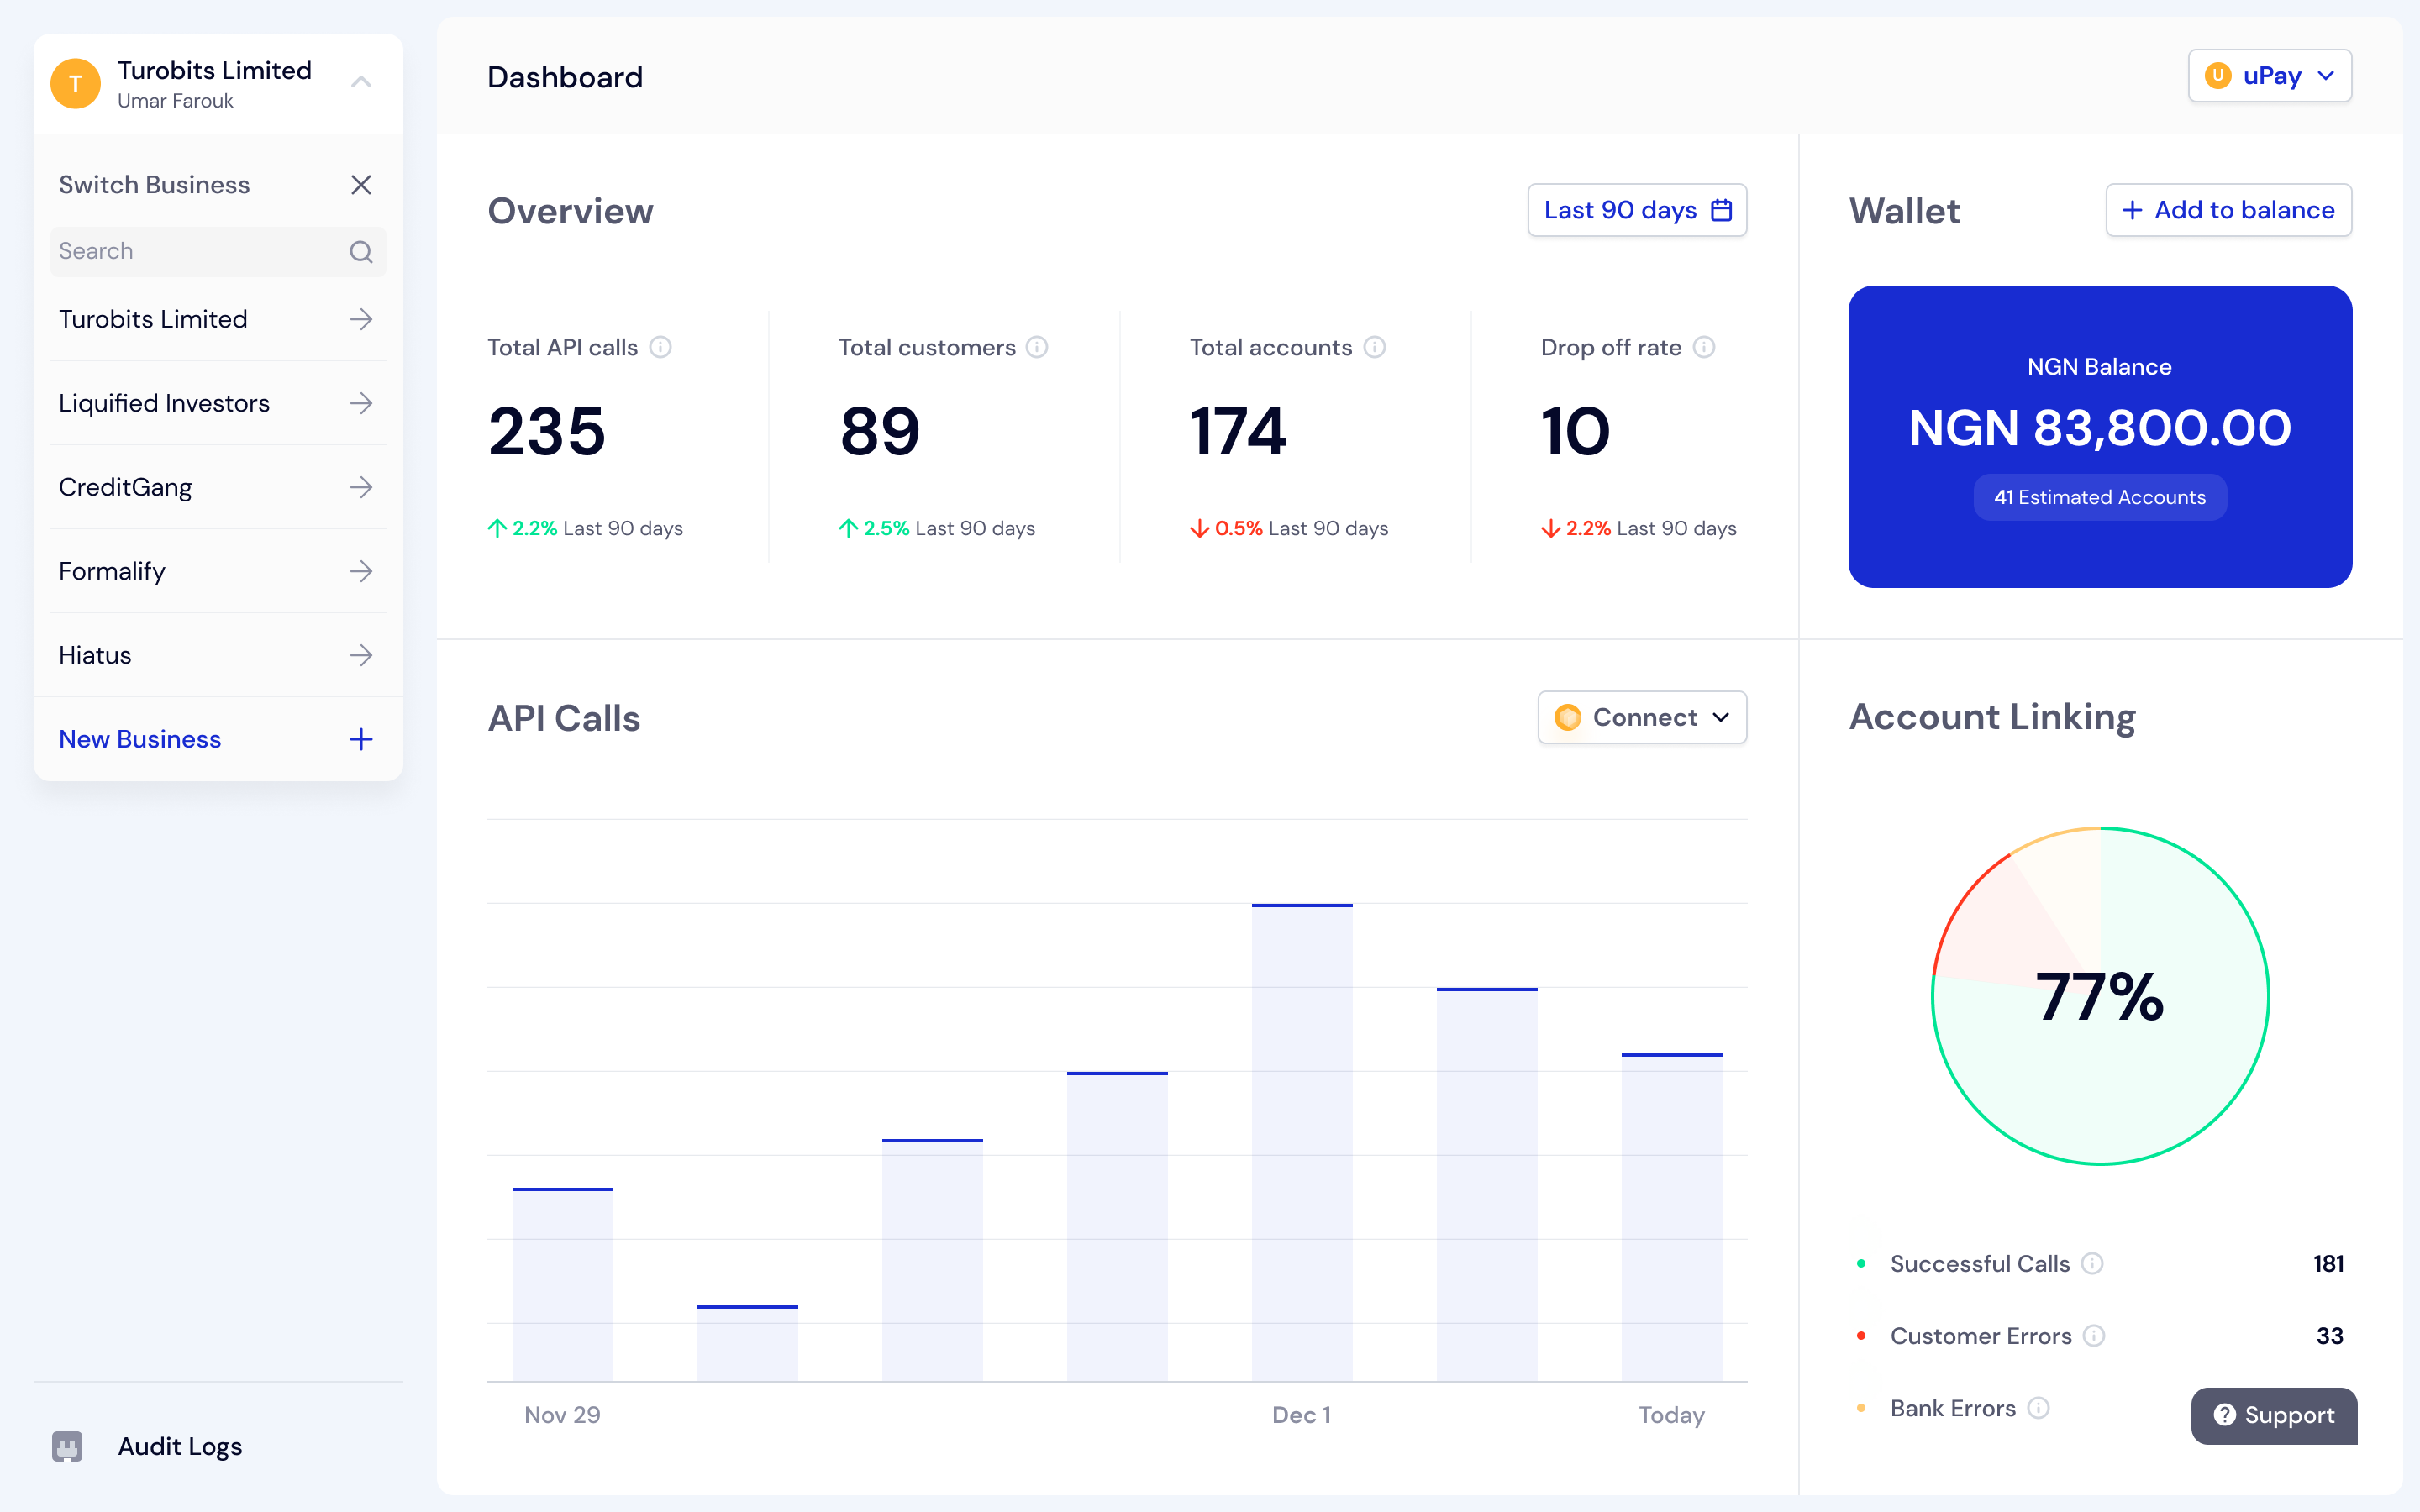
3. Analytics View
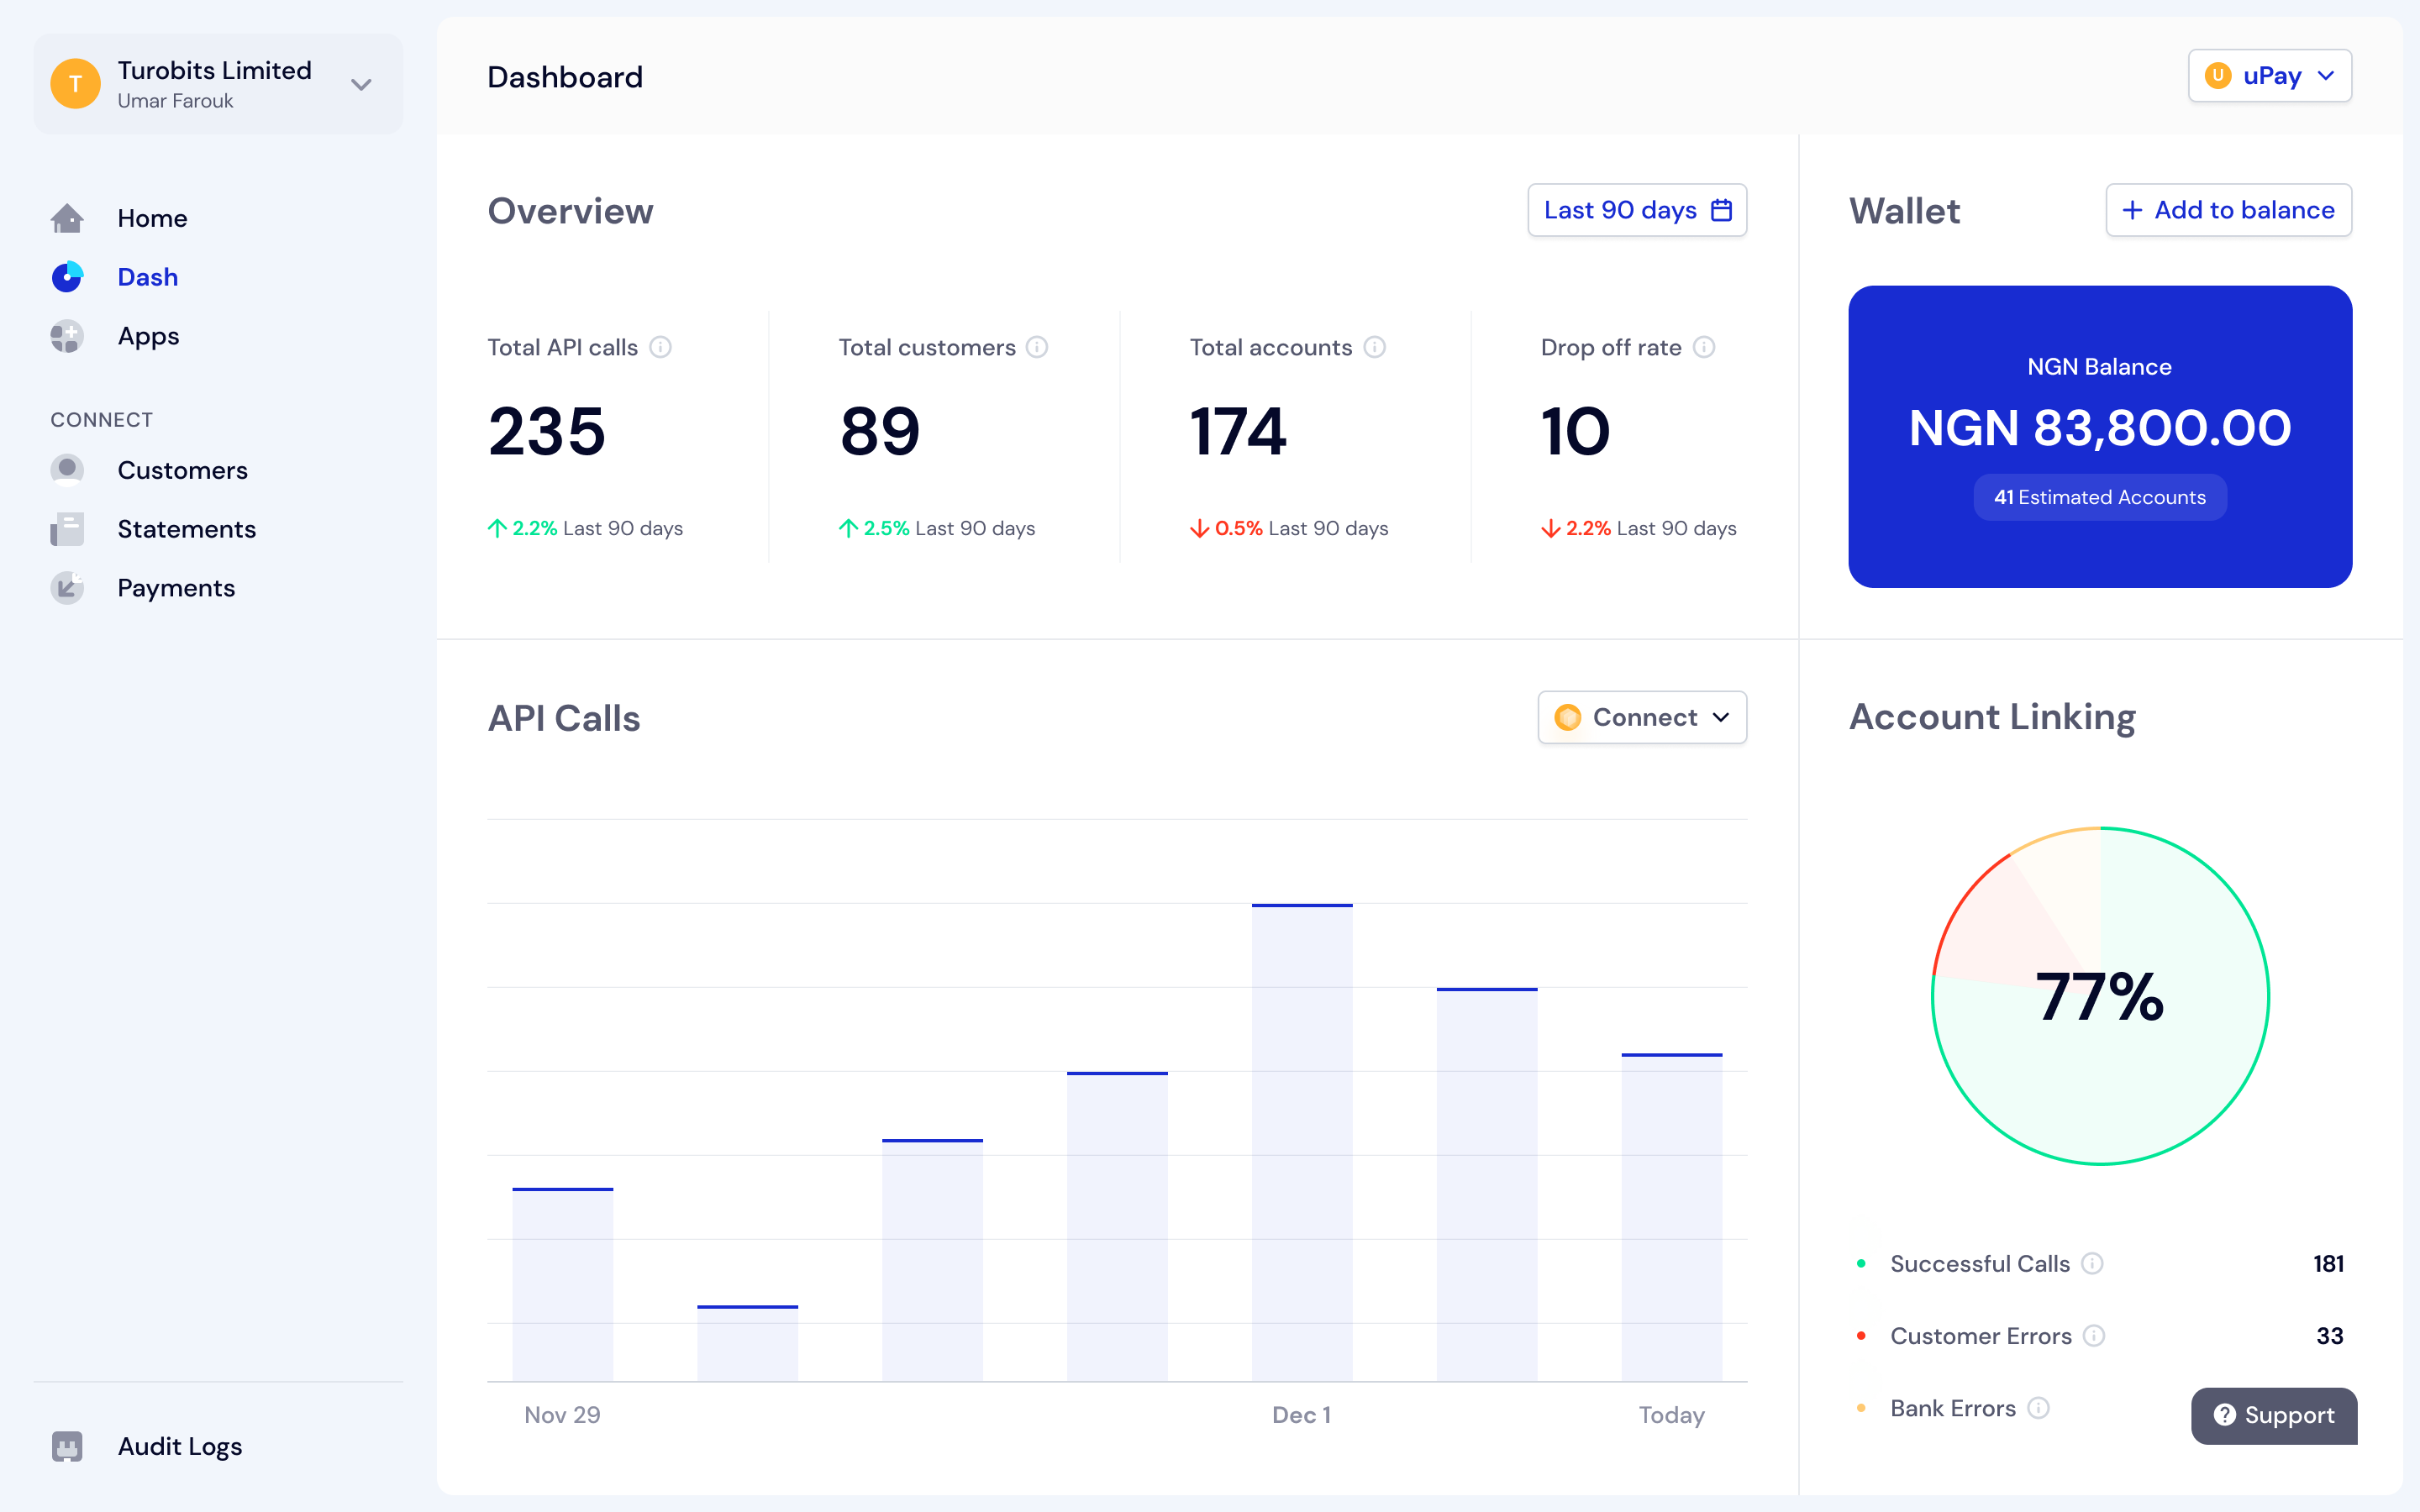
To help you get increased business insights into the customer data you collect with Mono, we have made it easier for partners to view and track all their data in one place on the Dash tab.
This gives you a quick overview of your business performance like:
The total API calls your apps have made
The total number of customers who linked their accounts to your business.
The total number of financial accounts that are linked to your business.
The drop-off rates of customers who use the Mono Connect Widget.
The number of successful and unsuccessful API calls made.
How to access this feature
On the sidebar, navigate to the Dash tab to keep track of your business metrics at a glance.
4. Statement Collection Interface
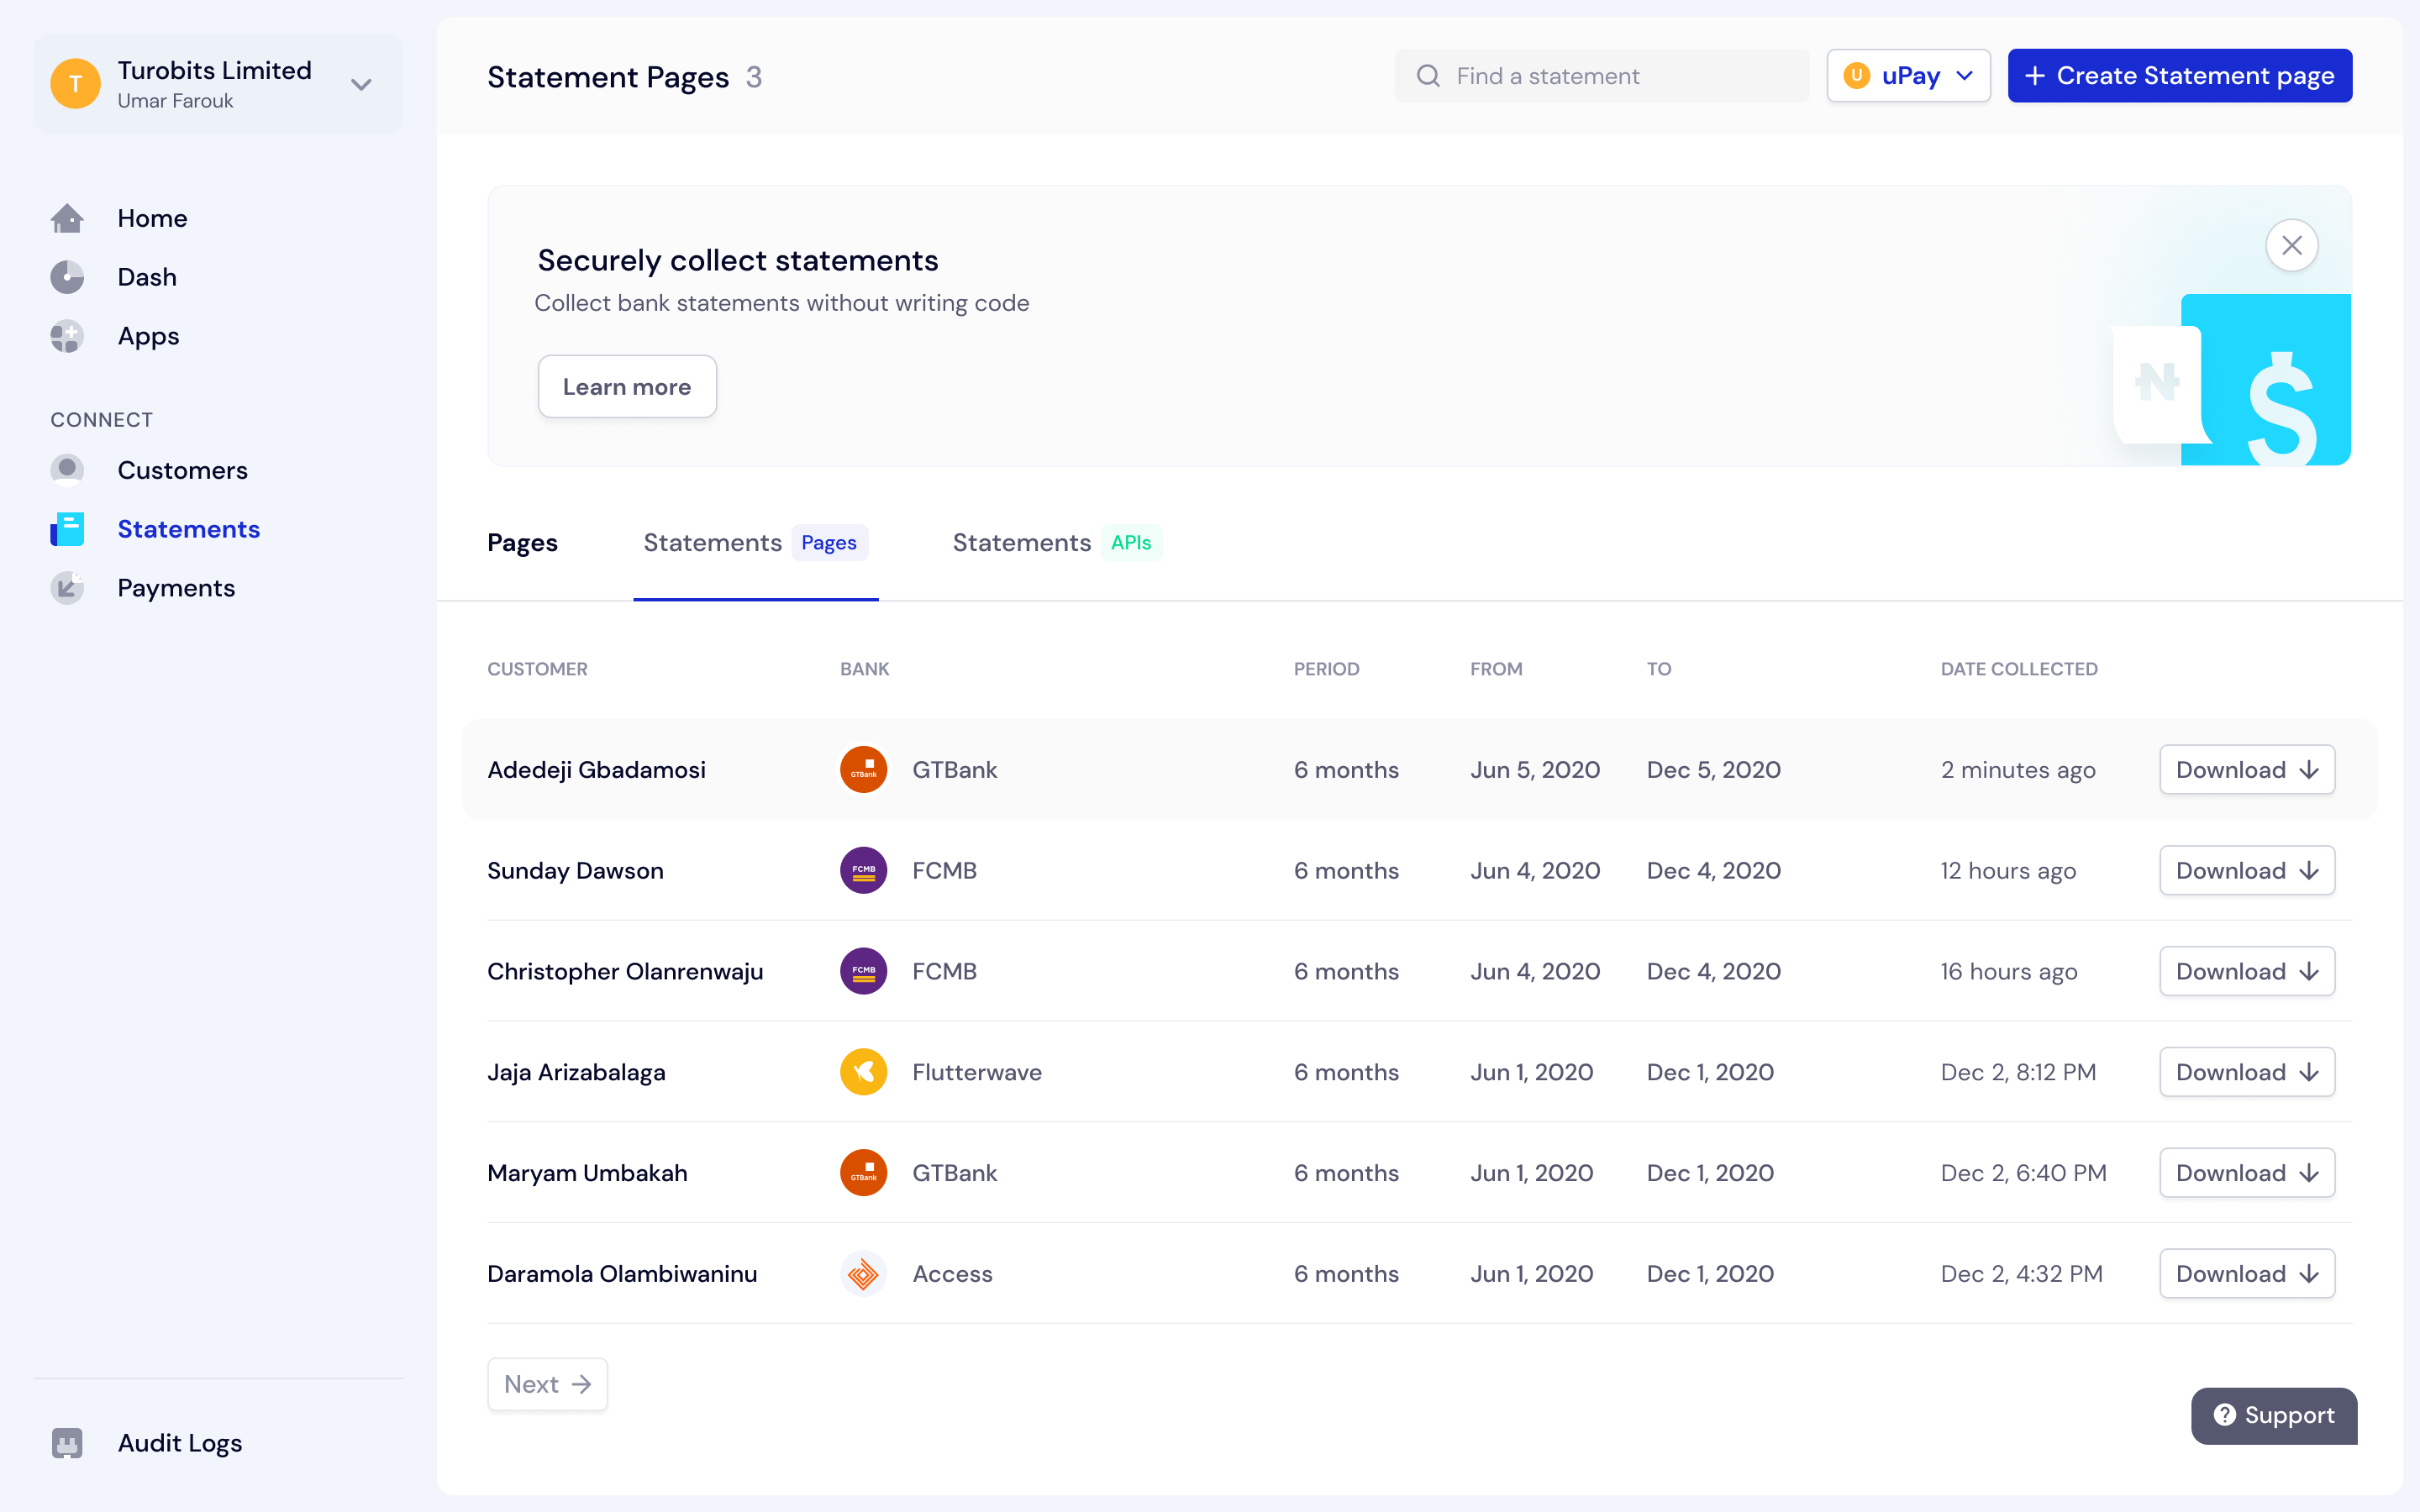
We have improved the interface for statement collection, so partners can now get an organized view of all statements they collected from customers using our Statements API or no-code Statement Pages. With this feature, you can easily download statements collected, regenerate statements, see each customer’s name, the financial institution used, statement duration, and the date each statement was collected. If you collect statements using Statement Pages, there’s a nifty feature that allows you to customize your Statement Pages link to something easy to recognize, when you create a statement page.
How to access this feature
On the sidebar, click on the Statements tab and you'll see all active statement pages created, all bank statements collected using Pages, and those collected using the API.
5. Wallet Estimator
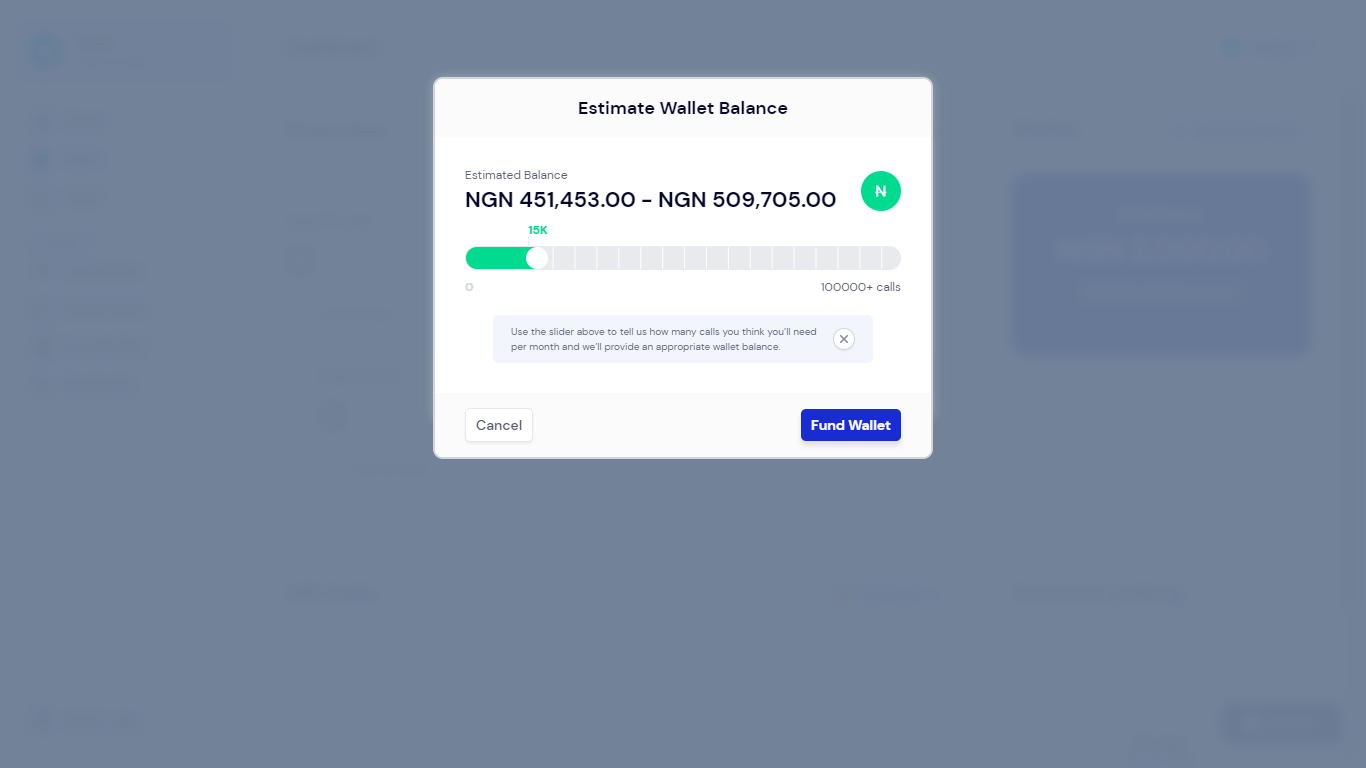
Just in case you are undecided about how much to fund your Mono wallet with, the Wallet Estimator comes in handy to help you make a more informed decision. Based on the number of API calls you averagely make per month, it shows you an estimated amount you fund your wallet with. This feature takes your pricing plan into consideration when making the estimates.
How to access this feature
On the Mono dashboard, navigate to the Dash tab and click the “Add to balance” button.
On the pop-up that appears, use the slider to select the total API calls you can make in a month and you will see an estimate of the amount to fund your wallet with.
If you’re satisfied with the amount estimate, simply click the “Fund wallet’ button to top up your wallet balance.
6. Wallet Threshold
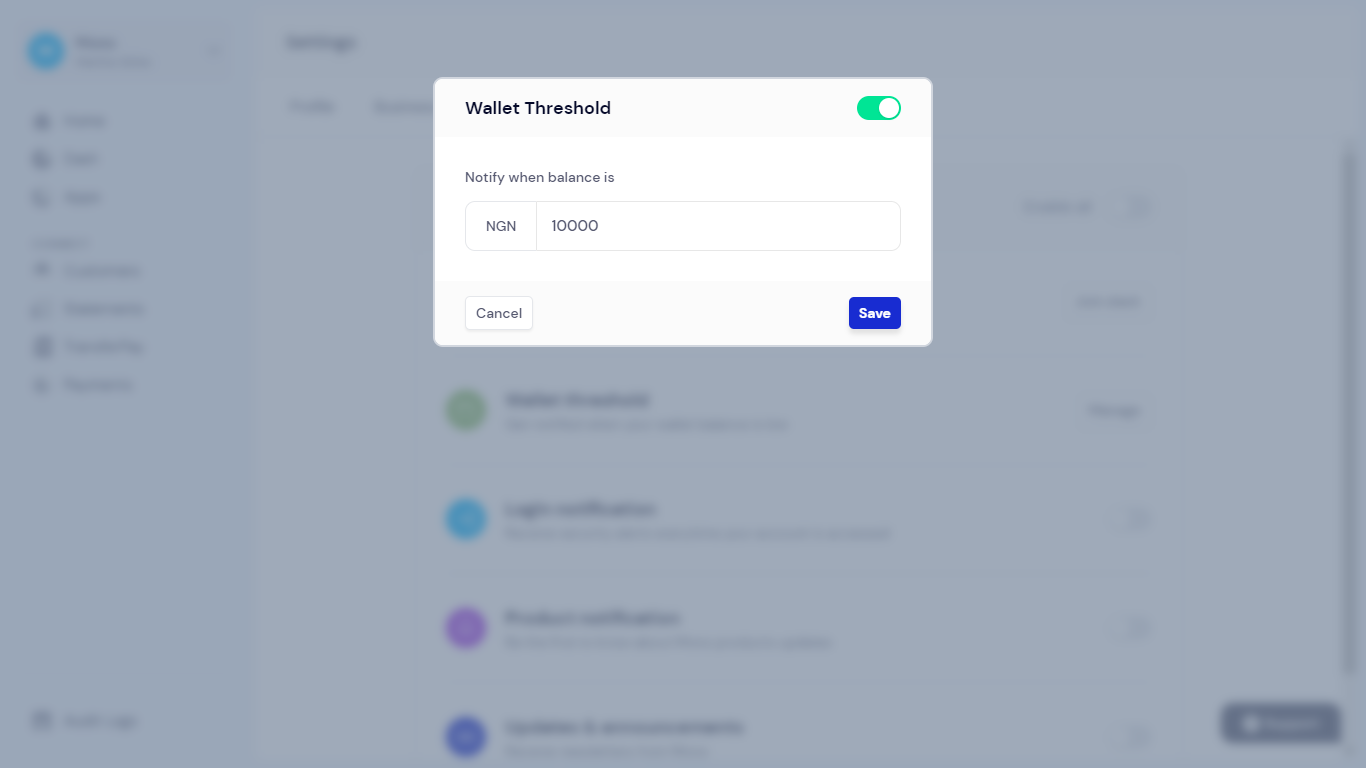
The wallet threshold feature lets you know when your wallet balance is running low, so you don’t experience any service disruption while using Mono. For this to work, you will need to specify the minimum amount you’d like to be notified about. And once your wallet balance reaches or goes below the set value, we will notify you via email to top up your wallet.
How to access this feature
On the top left corner of the screen, click on the dropdown that displays your business name, and click 'Settings'
On the Settings page, select Notification, and then navigate to 'Wallet threshold'.
Next, click the 'Manage' button, enter the amount you’d like to be notified of, and click 'Save' to automatically receive alerts when your wallet balance is running low.
7. Multiple Business Access
On the new Mono dashboard, you can now list and operate more than one business under one account. We’ve removed the hassle of creating different accounts for each business and having to log out and log back in to use either of them. With this new feature, you can add multiple businesses to one account, switch between them in seconds, and manage them easily, all on the same dashboard.
How to access this feature
On the top left of the sidebar, click the dropdown that displays your business name.
Click on “New Business” and fill in the required details to add a business to your account.
To switch between the businesses you have added, click on “Switch Business” and select the business you’d like to switch to.
8. Live Support
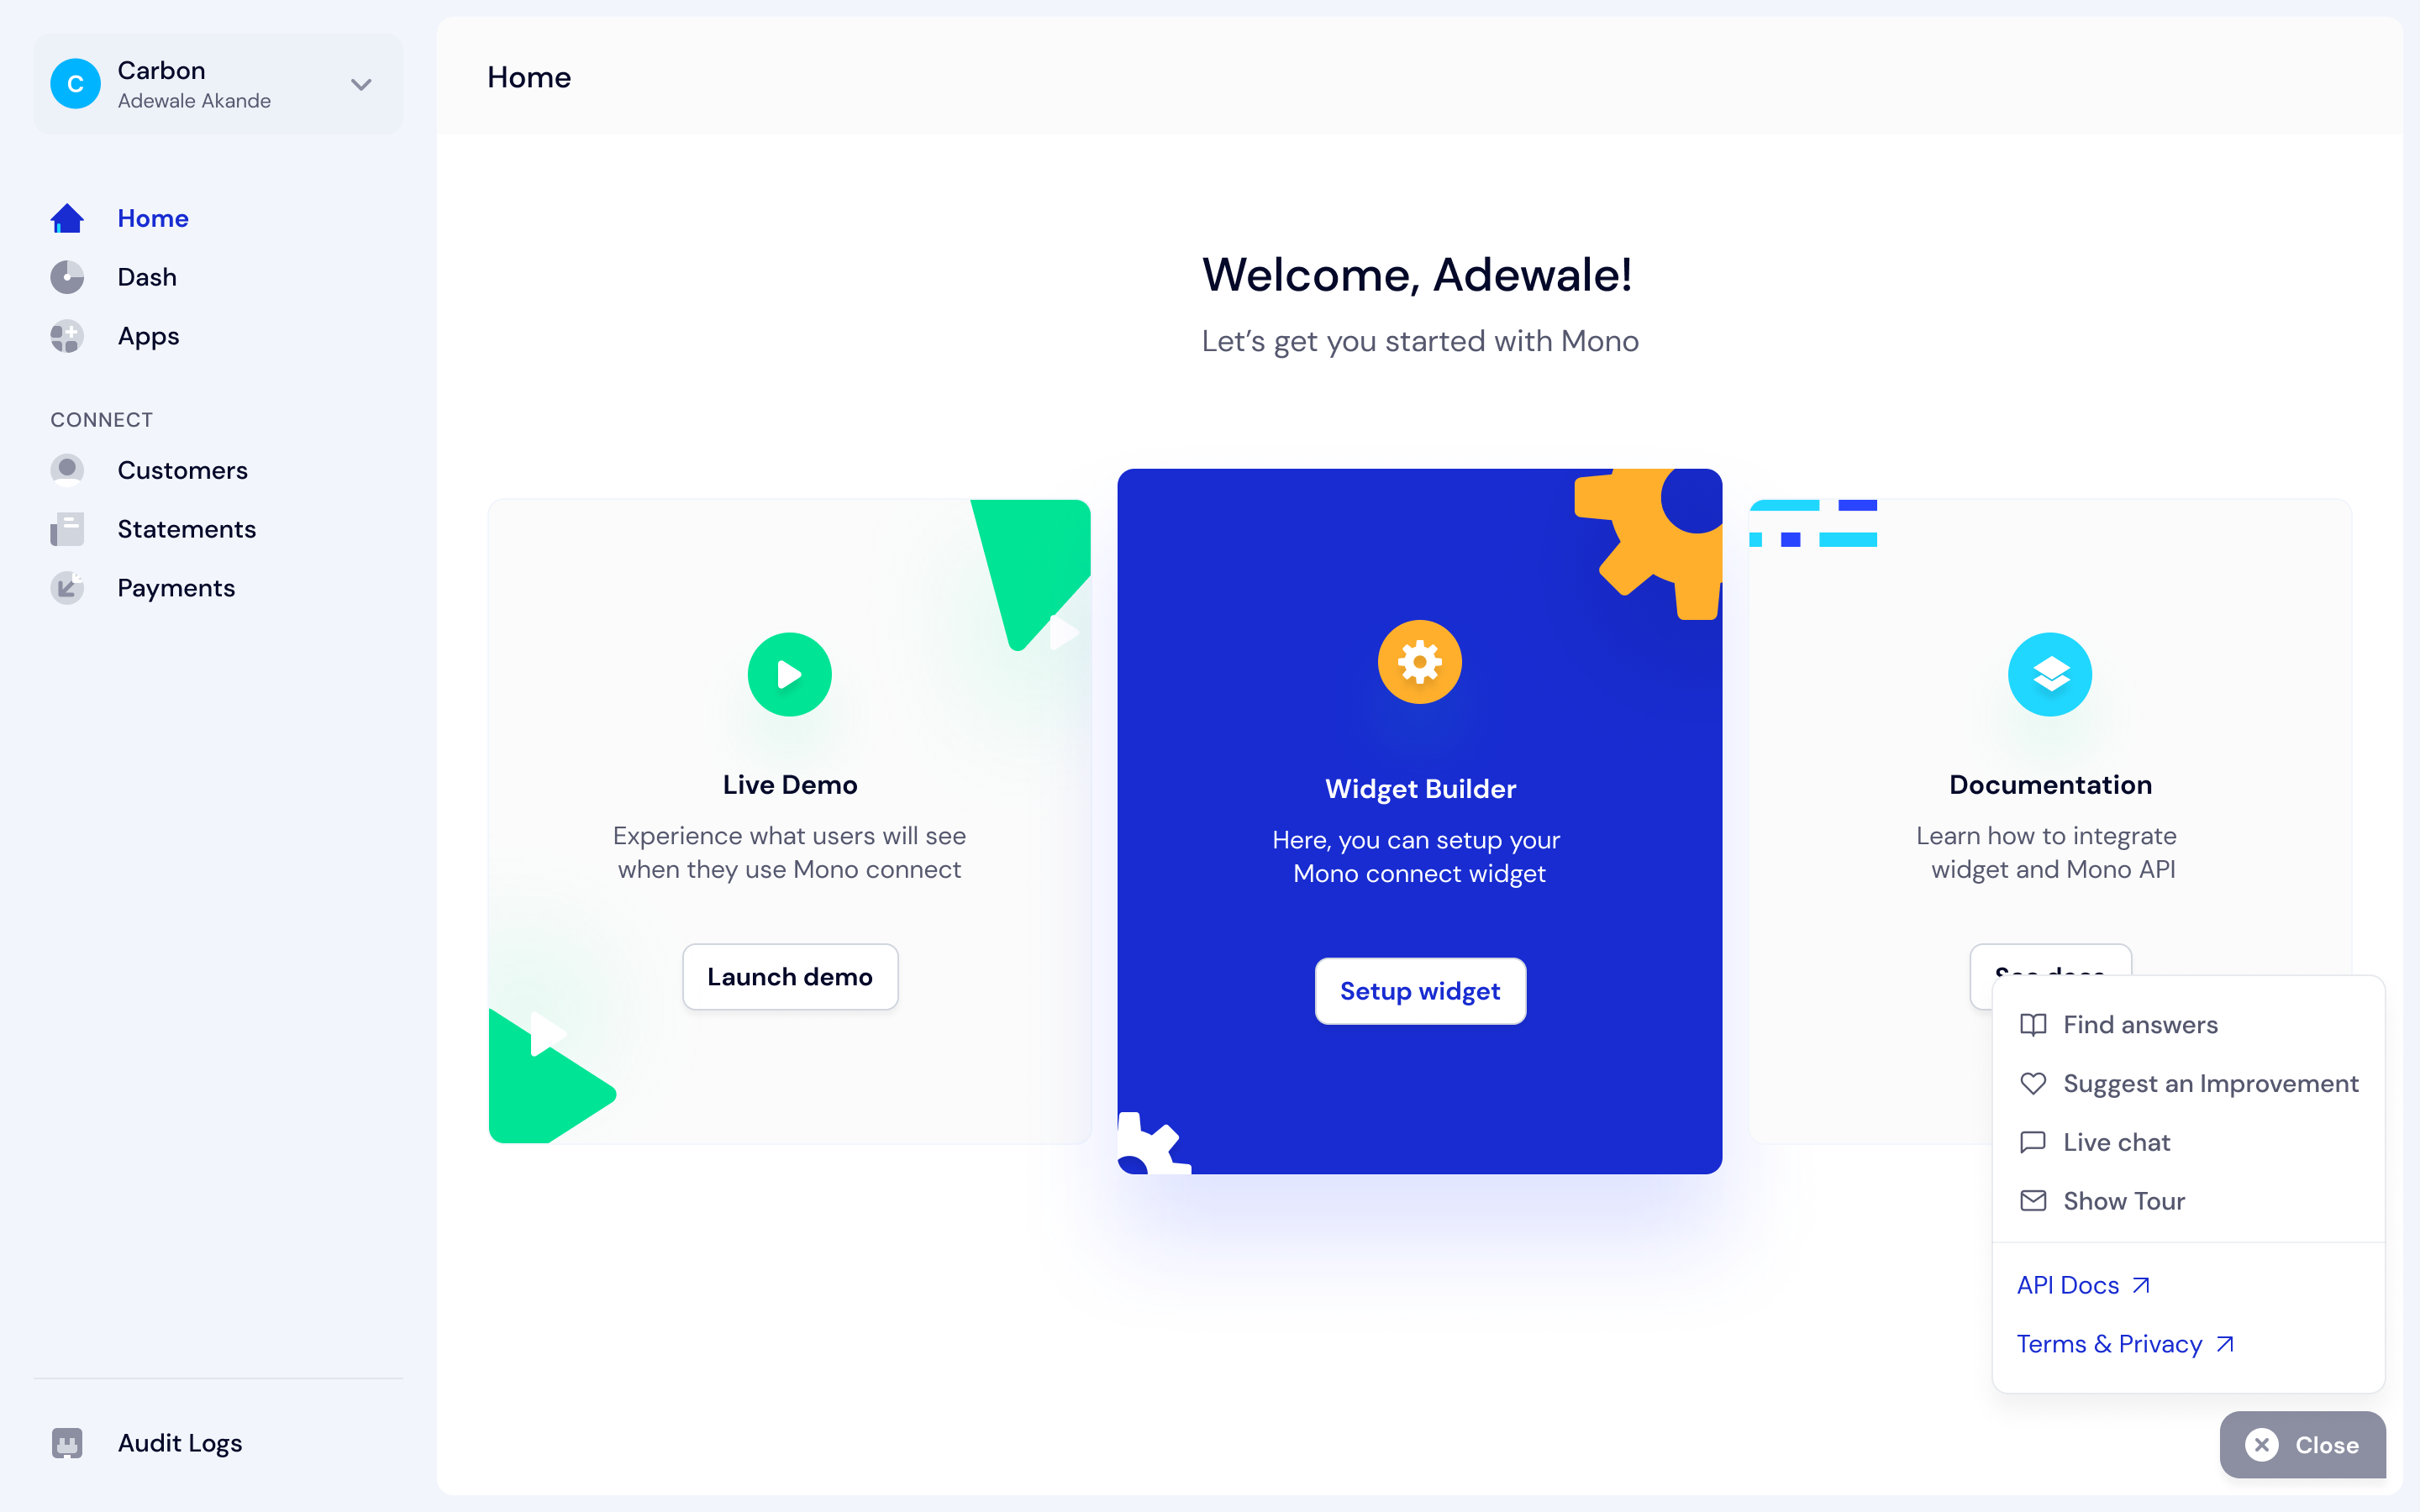
You can now access support whenever you need assistance on the Mono Dashboard. With one click, you can get answers to any questions you might have regarding our products, read our API docs, take a quick tour of the dashboard, or live chat with any of our User Operation Specialists – they typically reply in minutes.
How to access this feature
On any page of the dashboard you are on, look for the Support tab at the bottom right corner, and click on it to access any of our support resources.
9. Tiered User Roles and Permissions
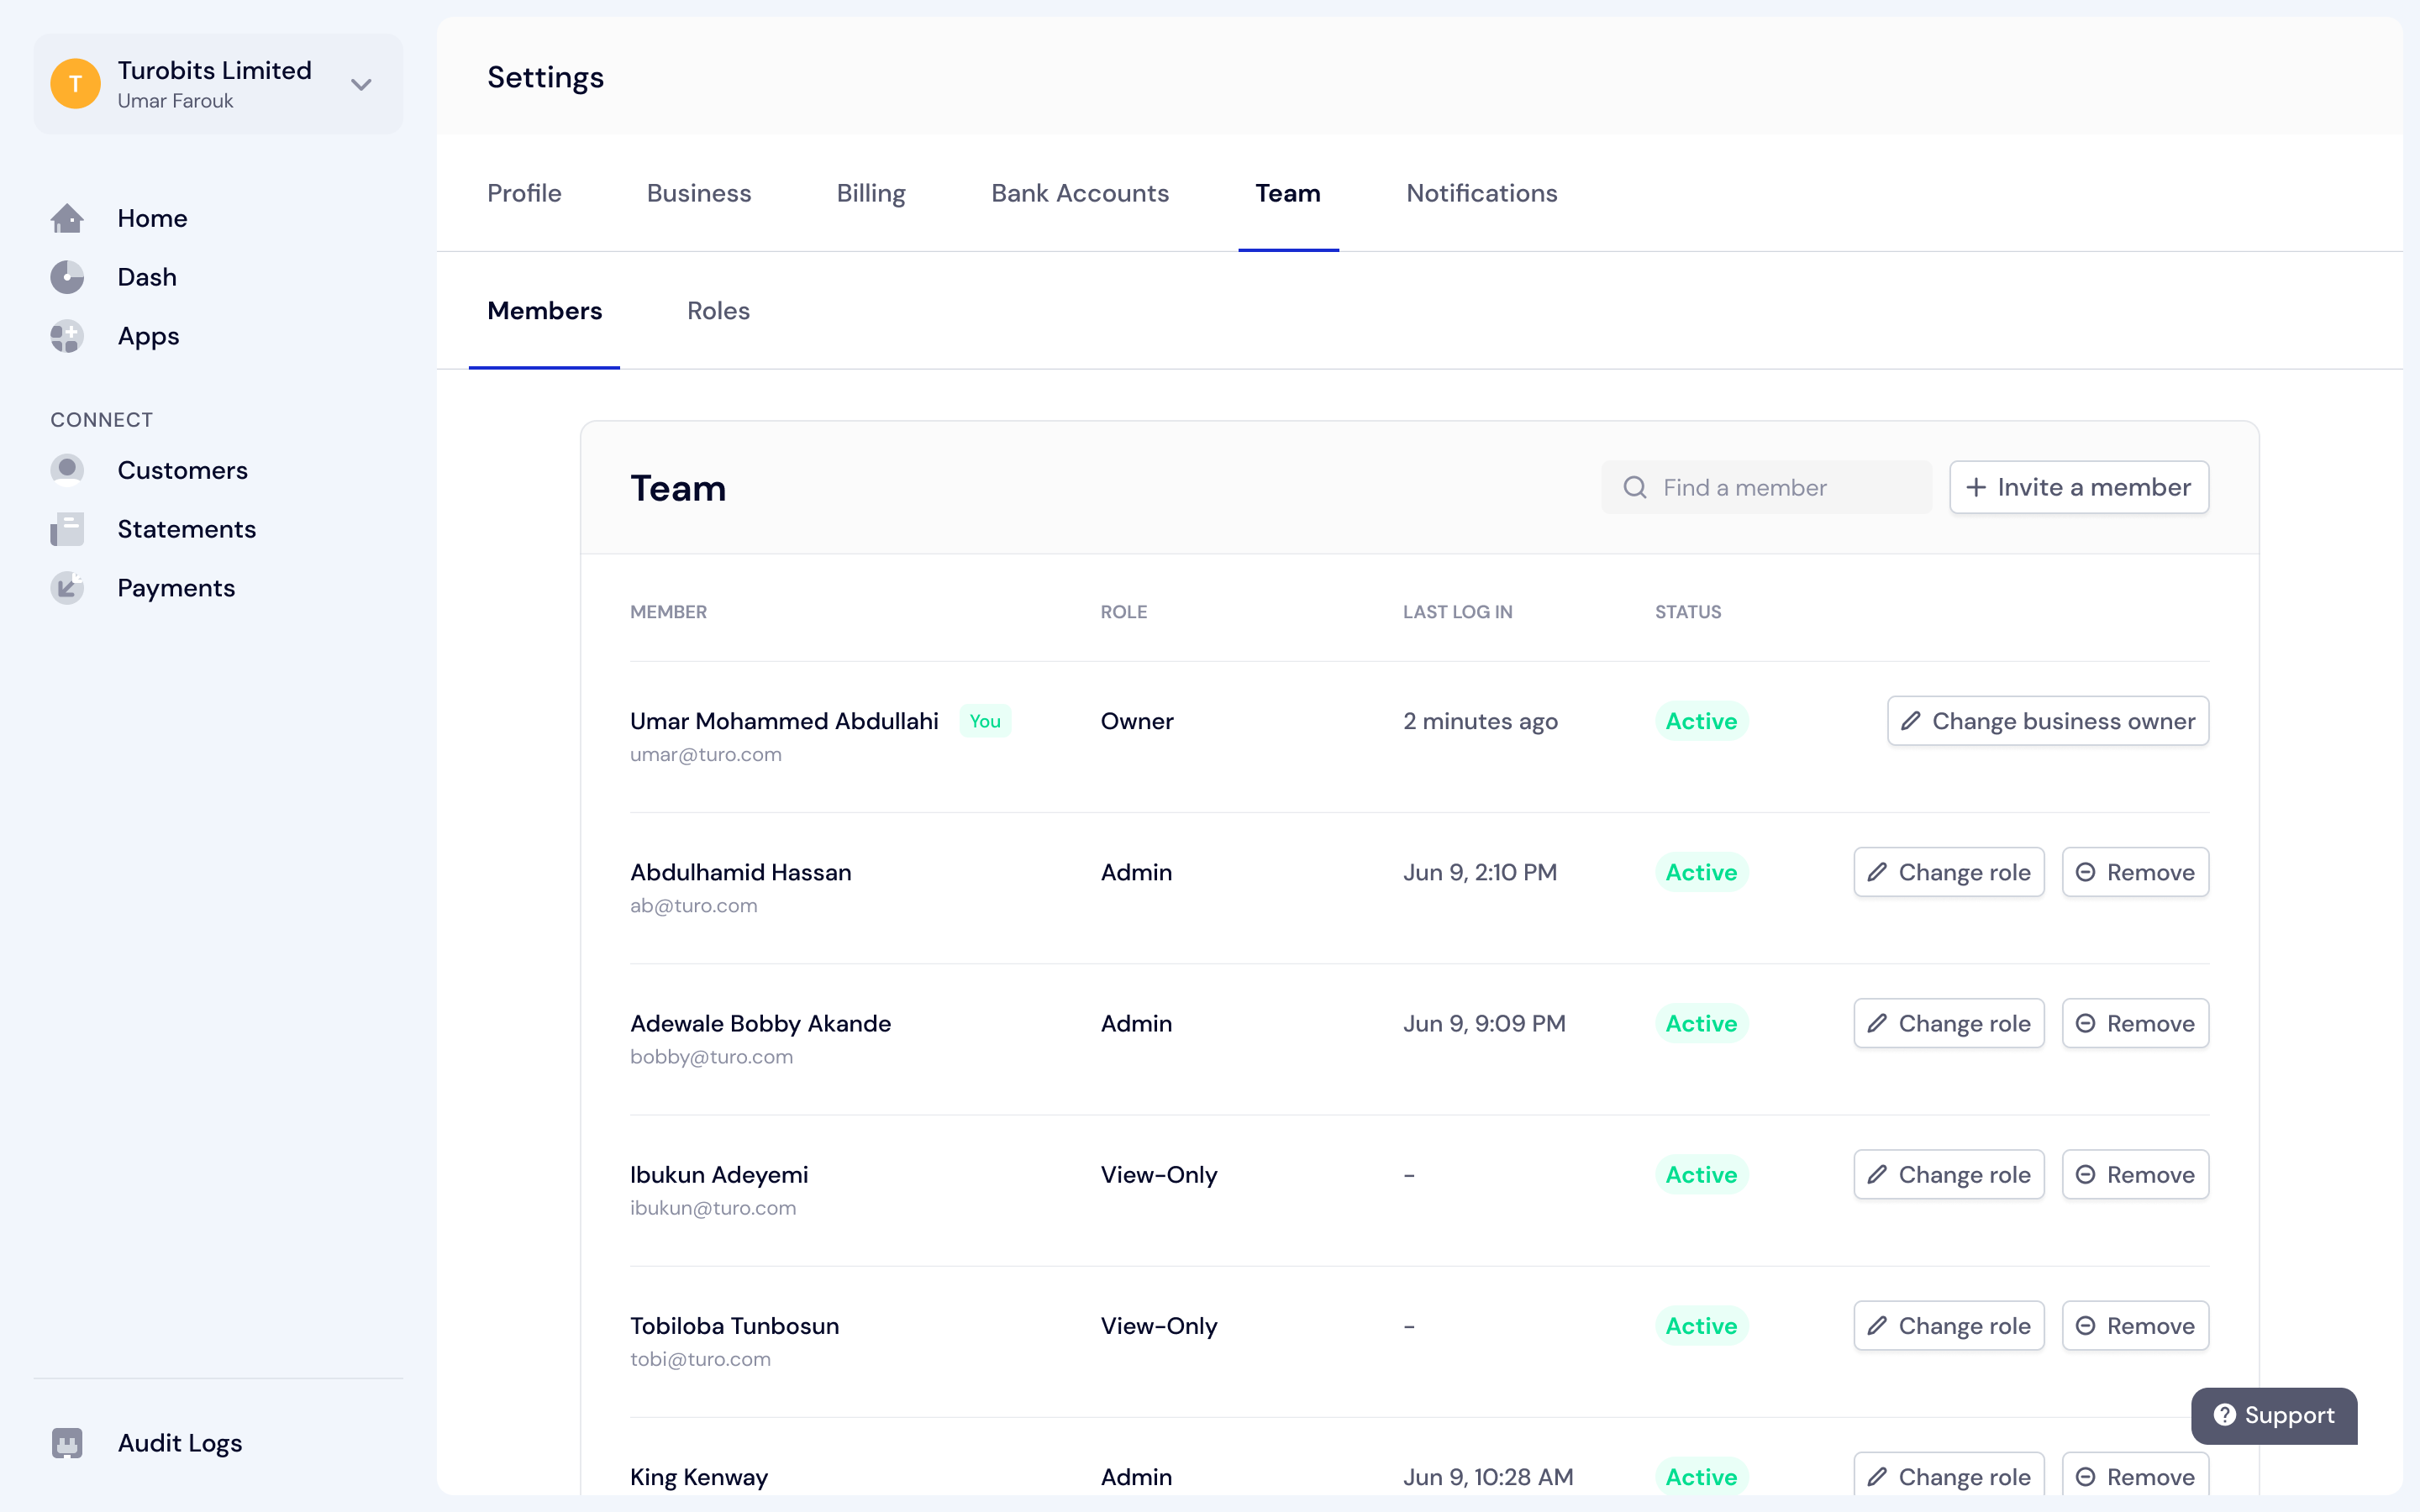
This feature lets you give different teammates the appropriate level of control they need when you invite them to the dashboard. This means that as an Administrator/Business Owner, you can assign specific user roles to each invited teammate to ensure they only access parts of the dashboard you want them to manage.
There are 4 tiers of user roles on the Mono dashboard:
Administrator: This is for business owners and company administrators who can have full access to your workspace.
Developer: This is for developers who are integrating Mono for your business.
Operations: This is ideal for teammates who can have full access to your account data but can’t change your business settings.
View Only: This is for team members who need view-only access to your shared workspace on the dashboard.
How to access this feature
On the top left of the sidebar, click the dropdown that displays your business name, and select Settings.
Navigate to the team tab and click on the “invite a member” button. Here, you can add the team member’s email, assign a user role, and then invite them to your dashboard.
There’s also the option to remove a teammate or change their role.
10. Audit Logs
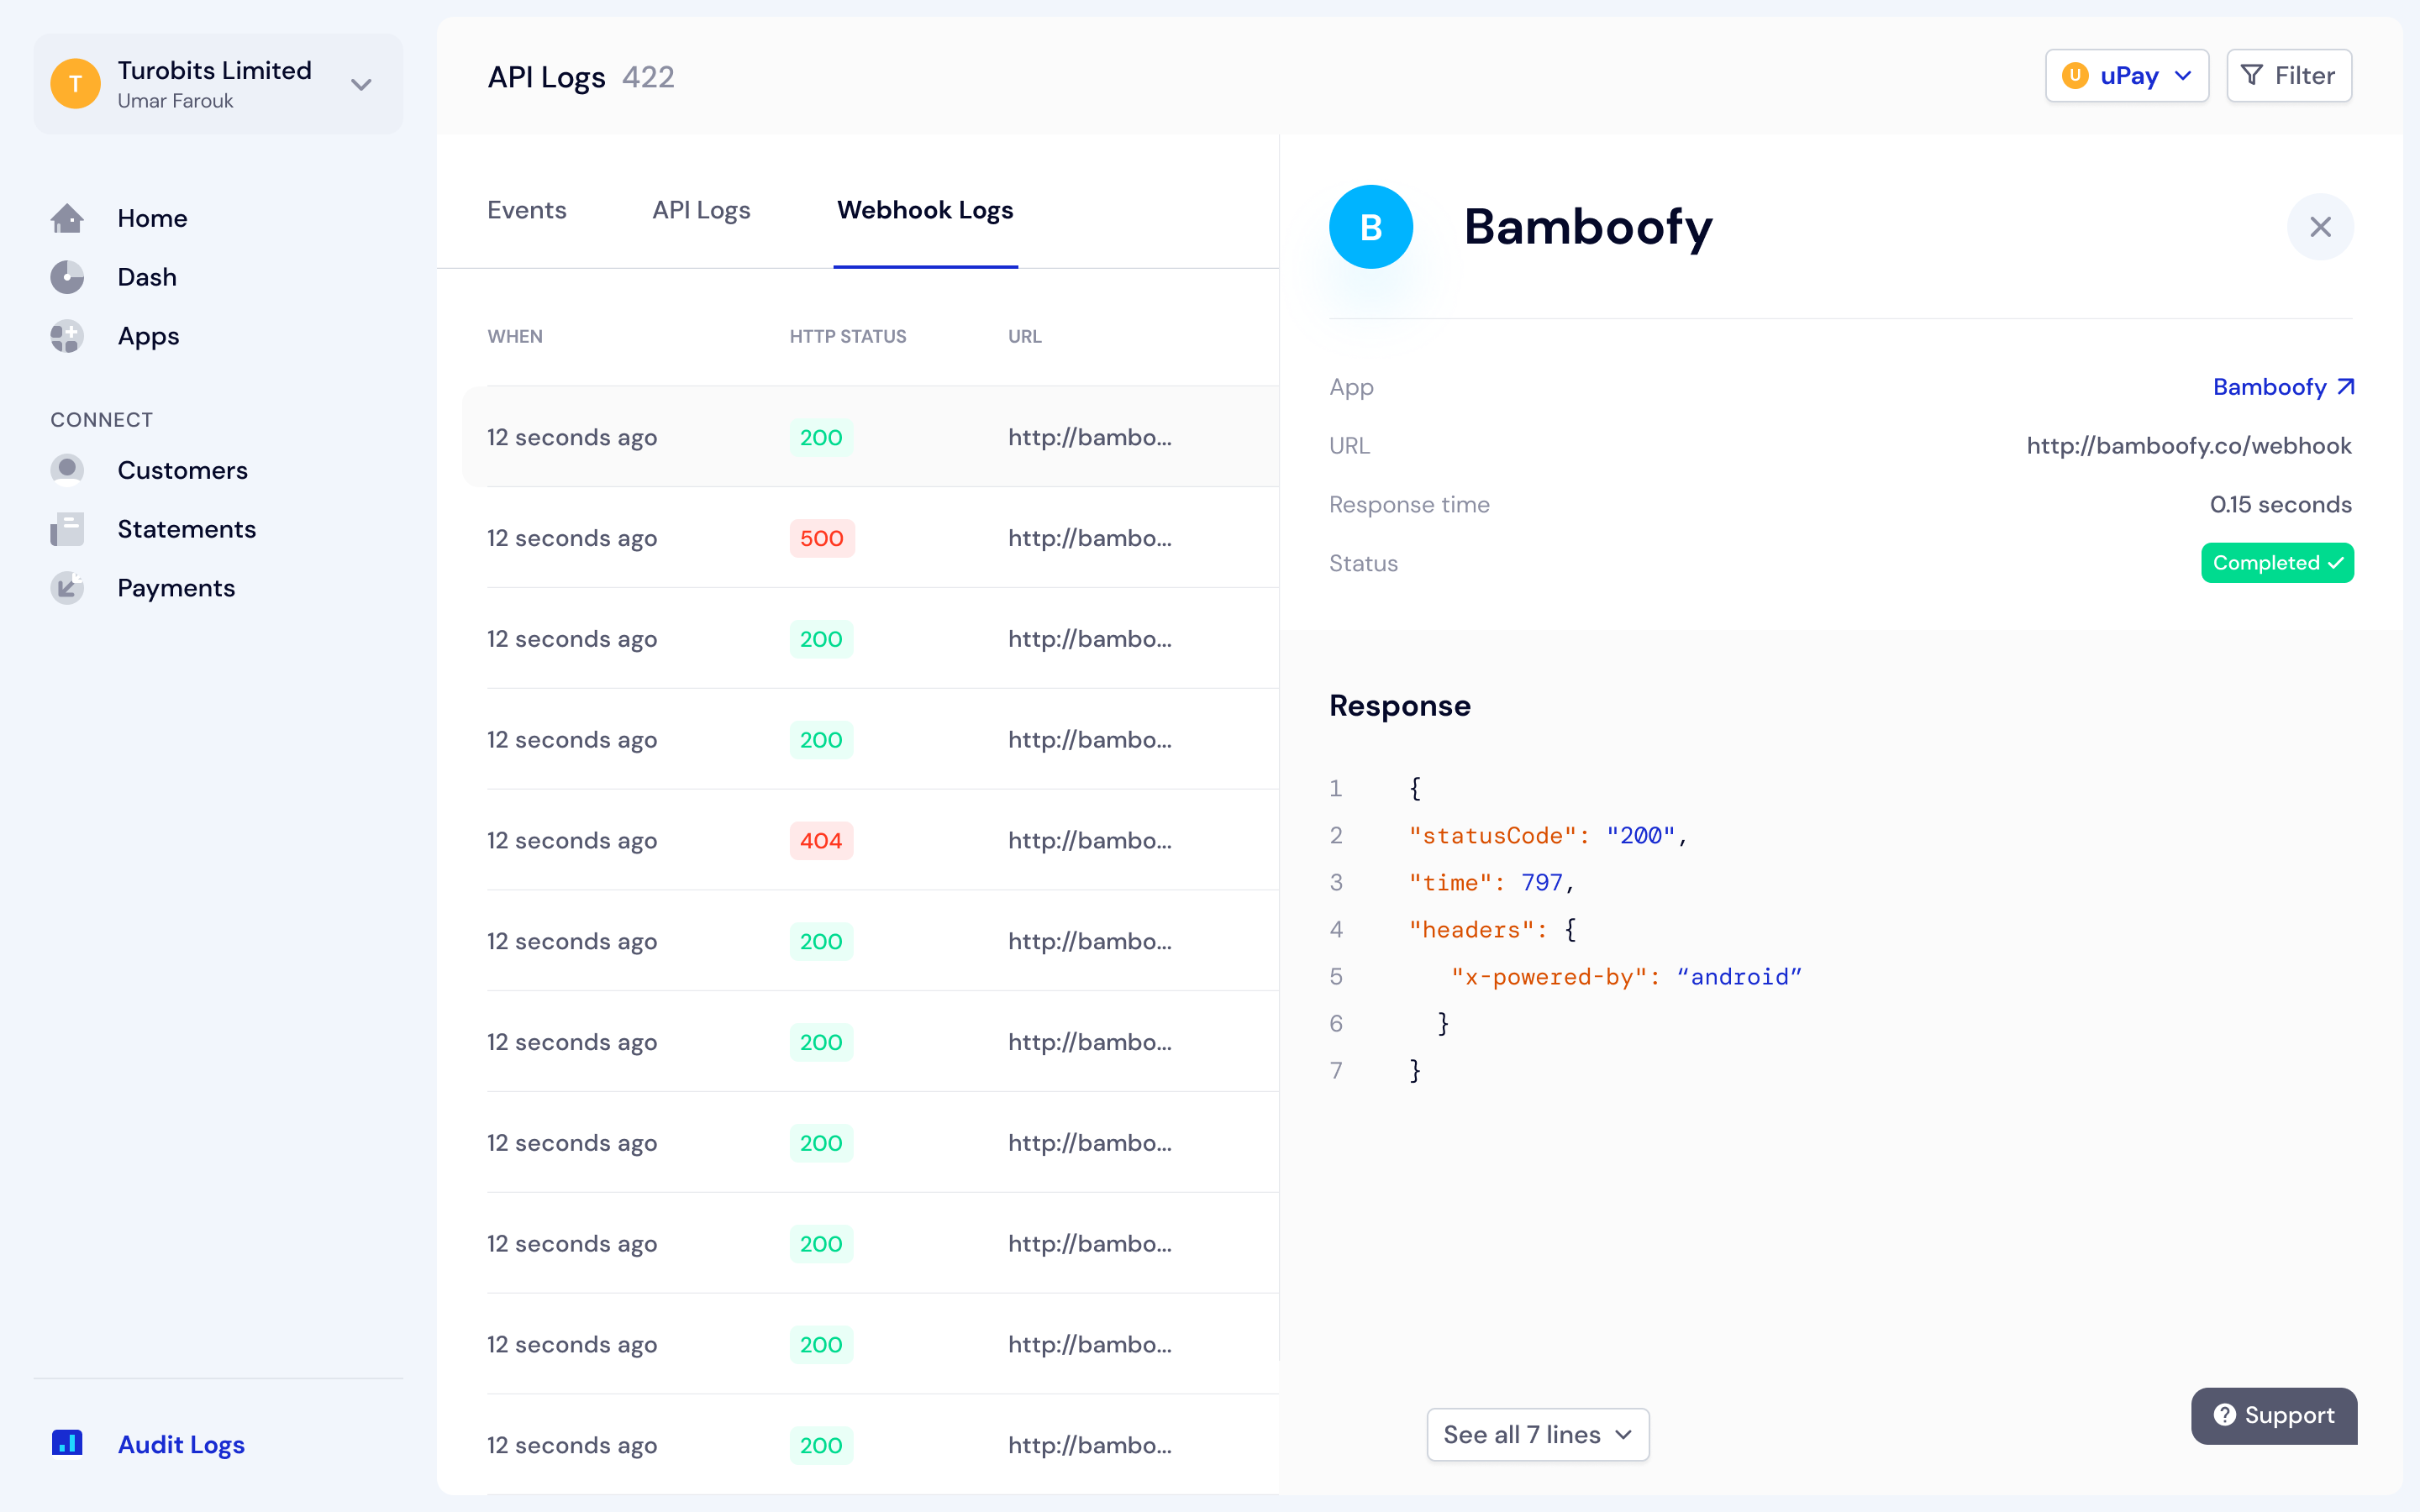
Staying on top of your Mono activity can now be done directly on the Mono dashboard. You can track teammate activity logs, check what endpoints were called, the status and cost of each API call, what webhooks were used, and the success statuses. You can also view the exact time for each activity.
How to access this feature
Log into the Mono dashboard, click the “Audit Logs” tab on the bottom left of the sidebar.
Then navigate through the options of Events, API Logs, and Webhook Logs to see your teammates’ activity.
You can also filter through Apps, App scope, and status to track specific teammates’ actions.
We’re here to help
We hope that you find these tools really helpful for your business, and get the most out of them. If you have more questions or need any assistance, you can always reach out to us at hi@mono.co.
We are constantly making improvements to these features too, so if you’d like to make some suggestions, simply click the Support tab on the dashboard to share them with us.

